はじまり

うーん、Notionへの投稿は自動化できたけど・・・

この文章の編集も自動化したくなってくるな。
ページの中身の編集も自動化しよう!
以前に下記の記事で、NotionのAPIを使ってNotionのページのプロパティや中身を取得する方法を照会しました。
そこで今回は、Google Apps Script(以降、GAS)を使って、Notionのページの中身を更新する方法を紹介していきます。そこで今回は主に、リッチテキストの更新の仕方を中心に見ていきましょう。
GASは、JavaScriptベースのプログラミング言語なので、今回のコードの殆どの部分は、Node.js、Deno、Bun等のランタイムでも利用できるかと思います。
今回使うNotion APIエンドポイント
今回使うNotion APIのエンドポイントは、「Create a page」エンドポイントと、「Append block children」エンドポイントです。
一定の頻度でNotionのページを自動で投稿したい場合に「Create a page」エンドポイント、決まったページを定期的に更新したい場合に「Append block children」エンドポイントが役に立つことでしょう。
「Create a page」エンドポイント
「Append block children」エンドポイント

Notionのリッチテキストで編集できる事柄
Notionのページを新規作成および更新する時に、リッチテキストを更新したいケースが出てくると思います。
そこで、Notion上で表示するリッチテキストを、APIで更新するためにこの公式ドキュメントが役に立ちます。

リッチテキストで編集できる事柄は、以下のとおりです。
| Property | Type | Description |
|---|---|---|
| bold | boolean | 太字にするかどうか。 |
| italic | boolean | イタリック体にするかどうか。 |
| strikethrough | boolean | 打ち消し線を付けるかどうか。 |
| underline | boolean | 下線を入れるかどうか。 |
| code | boolean | コードスタイルにするかどうか。 |
| color | string (enum) | 色を塗りたければ、塗る色を決める。 |
| mention | string (enum) or object | メンションする。 |
| Equation | string | LaTeXで数式を記述する。 |
| Linked text | object | テキストにリンクを貼れる。 |
bold(太字)
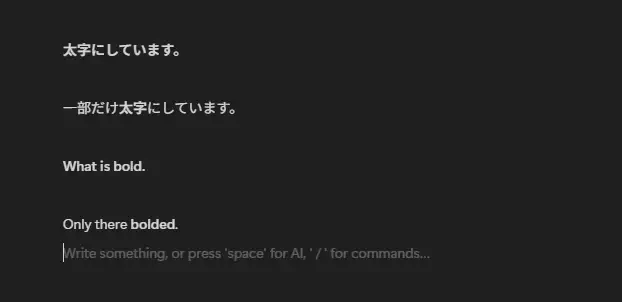
太字にするかどうかを制御します。boolean型なので、true / falseで設定します。
italic(イタリック体)
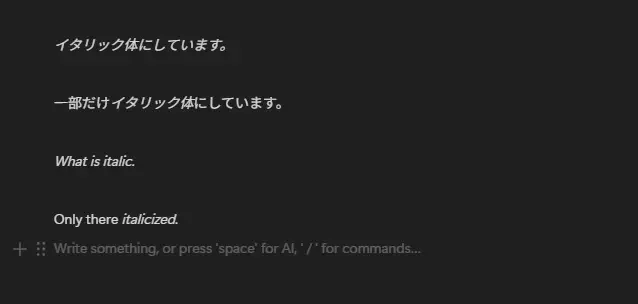
イタリック体にするかどうかを制御します。boolean型なので、true / falseで設定します。
strikethrough(打ち消し線)
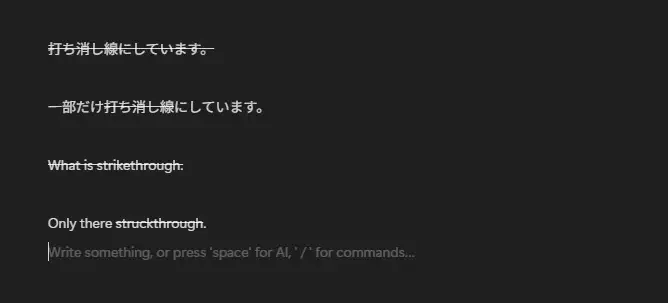
打ち消し線を付けるかどうかを制御します。boolean型なので、true / falseで設定します。
underline(下線、アンダーライン)
下線を入れるかどうかを制御します。boolean型なので、true / falseで設定します。
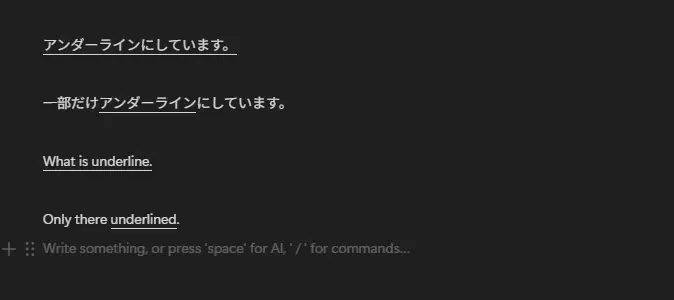
code(コードスタイル)
コードスタイルにするかどうかを制御します。boolean型なので、true / falseで設定します。
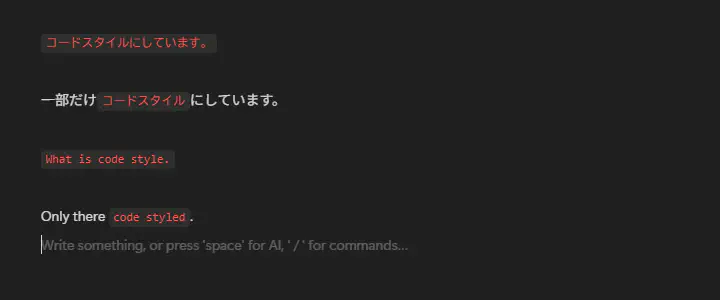
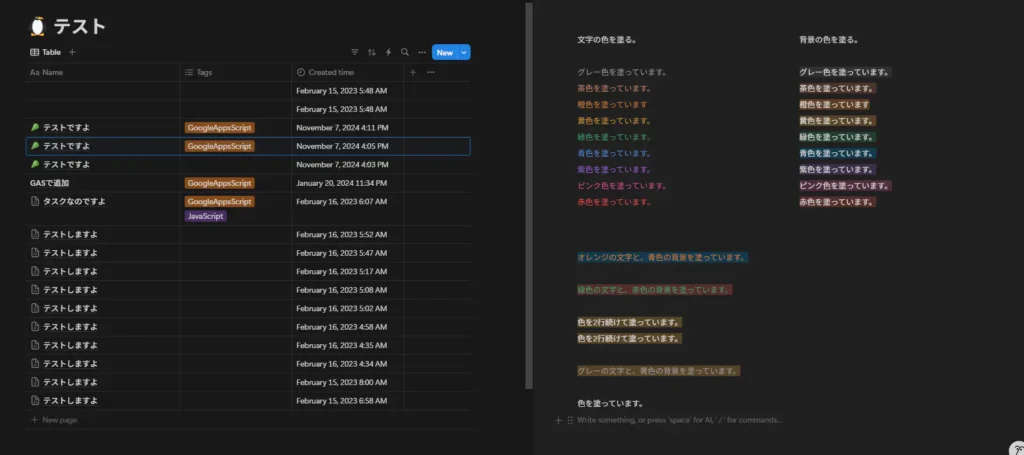
color(色を塗る)
そのブロックに色を塗りたければ、塗る色を決めることも出来ます。
塗ることが出来る色の種類は以下の通りです。
- “blue”
- “blue_background”
- “brown”
- “brown_background”
- “default”
- “gray”
- “gray_background”
- “green”
- “green_background”
- “orange”
- -“orange_background”
- “pink”
- “pink_background”
- “purple”
- “purple_background”
- “red”
- “red_background”
- “yellow”
- “yellow_background”
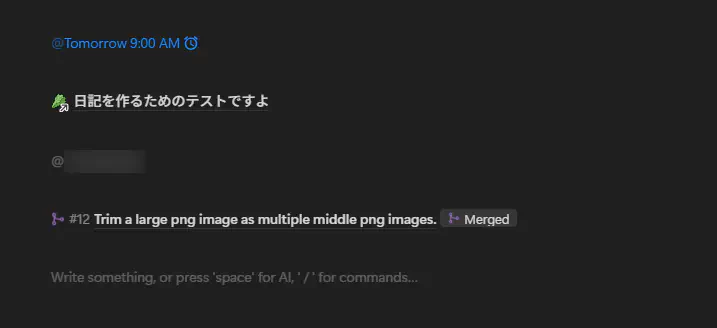
mention(メンション)
Notionのメンションは、色々なものにメンションすることが出来ます。
ユーザー、日時、他のページ、データベース、リンクを貼ってメンション、などなど・・・。
タスクを忘れないようにするための様々なメンションを利用できます。
Equation(数式)
LaTex形式で、数式を記述することが出来ます。

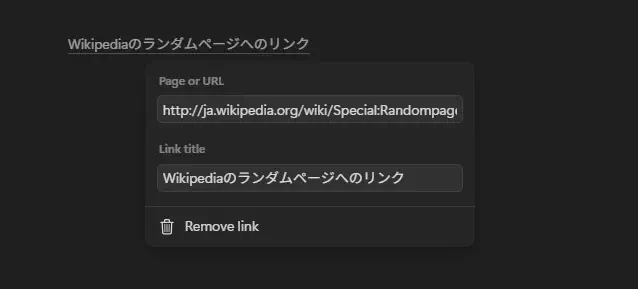
Linked text(リンク付きテキスト)
テキストにリンクを追加できます。追加したリンクおよびリンクされているテキストは後で編集できます。
APIでリッチテキストで編集するサンプル集
基本的には前述のリファレンスを見ながらJSONを組み立てていけば作れると思います。
しかし、JSONを組み立てるのは煩雑な作業ですので、この記事でJSONのサンプルを紹介していきたいと思います。
日記のテンプレートを作る。
それではまずは、日記のテンプレートを作ってみましょう。毎日、日記用のページがNotionに作成されるという想定のものになります。
ここで使うNotion APIのエンドポイントは、「Create a page」エンドポイントで、指定したデータベースの中に新しいページを追加します。
そして、下記のコードのcreateDiaryPage()を実行すると日記用のページが出来上がります。(200行以上あります・・・。)
function getAccessToken() {
  const accessToken = PropertiesService.getScriptProperties().getProperty("NOTION_INTEGRATION_TOKEN");
  return accessToken;
}

function createPage(databaseId, properties, children) {
  const endpoint = "https://api.notion.com/v1/pages";
  const options = {
    "muteHttpExceptions": true,
    "method" : "post",
    "headers" : {
      "Authorization": "Bearer " + getAccessToken(),
      "Notion-Version": "2022-06-28",
      "Content-Type": "application/json",
    },
    "payload" : JSON.stringify({
      "parent": {"database_id": databaseId},
      "icon": {
        "type": "emoji",
        "emoji": "🥬"
      },
      "properties": properties,
      "children": children
    })
  };
  const response = UrlFetchApp.fetch(endpoint, options);
  return JSON.parse(response.getContentText());
}

function createChildrenForDiary(){
  return [
    {
      "heading_1": {
        "rich_text": [
          {
            "text": {
              "content": Utilities.formatDate(new Date(), "JST", "yyyy年MM月dd日の日記")
            }
          }
        ]
      }
    }, {
      "paragraph": {
        "rich_text": [
          {
            "text": {
              "content": "天気:"
            }
          }, {
            "text": {
              "content": "晴れ、"
            }, "annotations": {
              "bold": true
              , "italic": false
              , "strikethrough": false
              , "underline": false
              , "code": false
              , "color": "orange_background"
            }
          }, {
            "text": {
              "content": "曇り、"
            }, "annotations": {
              "bold": true
              , "italic": false
              , "strikethrough": false
              , "underline": false
              , "code": false
              , "color": "gray_background"
            }
          }, {
            "text": {
              "content": "雨、"
            }, "annotations": {
              "bold": true
              , "italic": false
              , "strikethrough": false
              , "underline": false
              , "code": false
              , "color": "blue_background"
            }
          }
          , {
            "text": {
              "content": "雷"
            }, "annotations": {
              "bold": true
              , "italic": false
              , "strikethrough": false
              , "underline": false
              , "code": false
              , "color": "yellow_background"
            }
          }
        ]
      }
    }, {
      "heading_2": {
        "rich_text": [
          {
            "text": {
              "content": "今日の出来事"
            }, "annotations": {
              "bold": false
              , "italic": false
              , "strikethrough": false
              , "underline": false
              , "code": false
              , "color": "green_background"
            }
          }
        ]
      }
    }, {
      "bulleted_list_item": {
        "rich_text": [
          {
            "text": {
              "content": "出来事その1:"
            }, "annotations": {
              "bold": false
              , "italic": true
              , "strikethrough": false
              , "underline": false
              , "code": false
              , "color": "default"
            }
          }
        ]
      }
    }, {
      "bulleted_list_item": {
        "rich_text": [
          {
            "text": {
              "content": "出来事その2:"
            }, "annotations": {
              "bold": false
              , "italic": true
              , "strikethrough": false
              , "underline": false
              , "code": false
              , "color": "default"
            }
          }
        ]
      }
    }, {
      "heading_2": {
        "rich_text": [
          {
            "text": {
              "content": "感想"
            }, "annotations": {
              "bold": false
              , "italic": false
              , "strikethrough": false
              , "underline": false
              , "code": false
              , "color": "yellow_background"
            }
          }
        ]
      }
    }, {
      "paragraph": {
        "rich_text": [
          {
            "text": {
              "content": ""
            }
          }
        ]
      }
    }, {
      "heading_2": {
        "rich_text": [
          {
            "text": {
              "content": "明日の目標"
            }, "annotations": {
              "bold": false
              , "italic": false
              , "strikethrough": false
              , "underline": false
              , "code": false
              , "color": "pink_background"
            }
          }
        ]
      }
    }, {
      "paragraph": {
        "rich_text": [
          {
            "text": {
              "content": ""
            }
          }
        ]
      }
    }, {
      "heading_2": {
        "rich_text": [
          {
            "text": {
              "content": "過去の記録"
            }, "annotations": {
              "bold": false
              , "italic": false
              , "strikethrough": false
              , "underline": false
              , "code": false
              , "color": "default"
            }
          }
        ]
      }
    }
  ];
}

function createDiaryPage() {
  const databaseId = "your_database_id";
  const properties = {
    "Name": {
      "title": [
        {
          "text": {
            "content": "日記を作るためのテストですよ"
          }
        }
      ]
    },
    "Tags": {
      "multi_select": [
        {
          "name": "Diary"
        }
      ]
    }
  }
  const children = createChildrenForDiary();
  console.log(createPage(databaseId, properties, children));
}
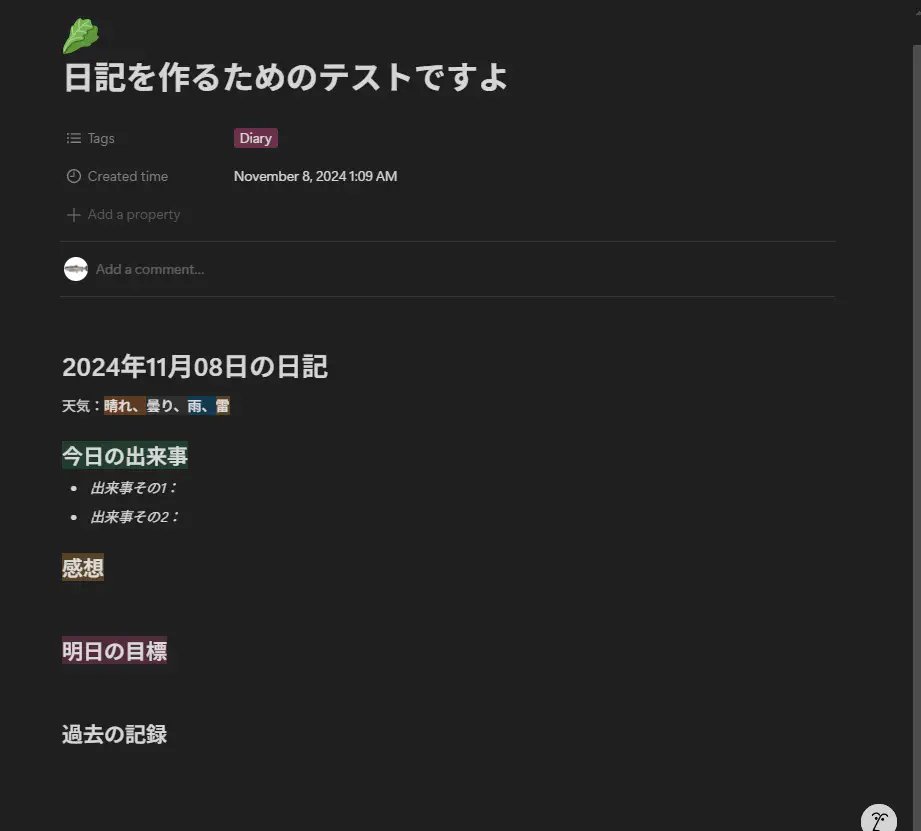
createChildrenForDiary()でページの内容を取得して、createPage()でページを実際に作ります。実際に上記のコードが走ると、下記のような日記が作成されます。
たったこれだけのボリュームで200行以上必要なんですね・・・。でもJSONの形を崩したら訳が分からなくなりそう・・・。
ページの中に新しいブロックを追加する。
次は、その作成したページに、新しいブロックを追加してみましょう。
ここでは、Notion APIの「Append block children」エンドポイントを使っていきます。
そして、下記のコードのappendChildrenOfDiary()を実行すると、先程の日記用のページにブロックが追加されます。(100行ぐらいです。)
function appendBlockChildren(blockId, children){
  const endpoint = "https://api.notion.com/v1/blocks/" + blockId + "/children";
  const options = {
    "muteHttpExceptions": true,
    "method" : "patch",
    "headers" : {
      "Authorization": "Bearer " + getAccessToken(),
      "Notion-Version": "2022-06-28",
      "Content-Type": "application/json",
    },
    "payload" : JSON.stringify({
      "children": children
    })
  };
  const response = UrlFetchApp.fetch(endpoint, options);
  return JSON.parse(response.getContentText());
}

function createChildrenToAppend(){
  return [
    {
      "bulleted_list_item": {
        "rich_text": [
          {
            "text": {
              "content": "シン・仮面ライダーを見た!"
            }, "annotations": {
              "bold": true
              , "italic": false
              , "strikethrough": false
              , "underline": false
              , "code": false
              , "color": "red_background"
            }
          }
        ]
      }
    }, {
      "bulleted_list_item": {
        "rich_text": [
          {
            "text": {
              "content": "シン・ゴジラは見られなかった・・・"
            }, "annotations": {
              "bold": false
              , "italic": false
              , "strikethrough": true
              , "underline": false
              , "code": false
              , "color": "gray"
            }
          }
        ]
      }
    }, {
      "bulleted_list_item": {
        "rich_text": [
          {
            "text": {
              "content": "いや、きっとシン・ゴジラを見てやるんだ・・・!"
            }, "annotations": {
              "bold": true
              , "italic": false
              , "strikethrough": false
              , "underline": true
              , "code": false
              , "color": "orange"
            }
          }
        ]
      }
    }
  ];
}

function appendChildrenOfDiary() {
  const blockId = "your_block_id";
  const children = createChildrenToAppend();
  console.log(appendBlockChildren(blockId, children));
}
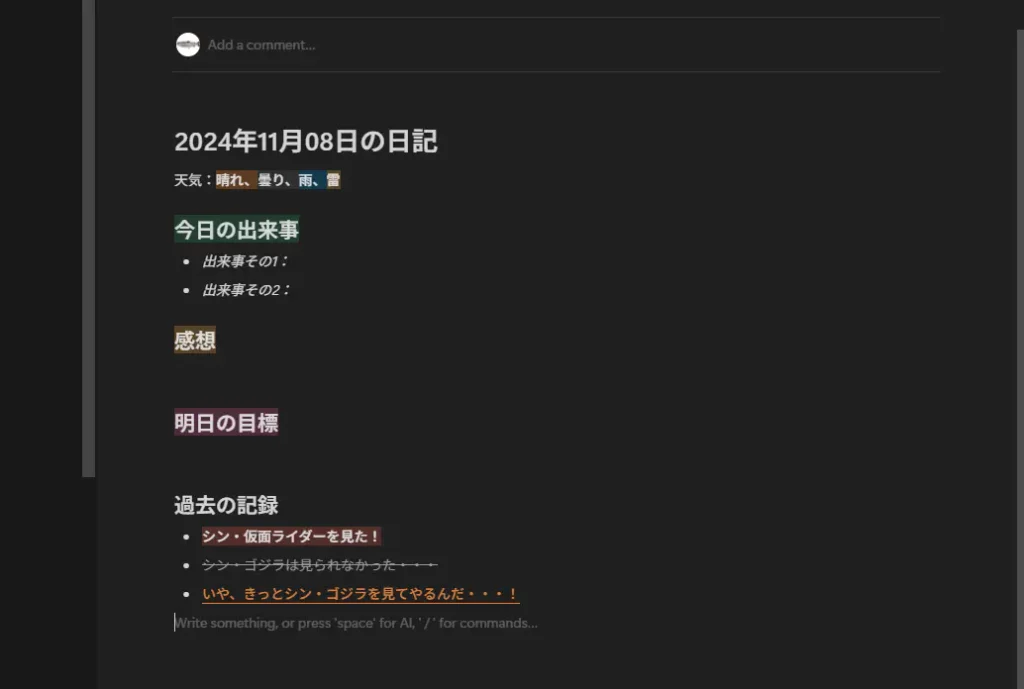
上記のコードを実行すると、下記の画像のように「過去の記録」の下に新しいブロックが追加されました。
ちなみに、「過去の記録」のブロックと、今追加したブロックは「親子」の関係ではありません。言うなれば「兄弟」の関係です。今追加したブロックの親は、ページになります。
ちなみに、childrenを持つことが出来ないブロックを指定すると、以下のようなエラーレスポンスが返ってきます。
{ object: ‘error’, status: 400, code: ‘validation_error’, message: ‘Block does not support children.’, request_id: ‘xxxxxxxx-xxxx-xxxx-xxxx-xxxxxxxxxxxx’ }
ページの中に新しいブロックを、位置を指定して追加する。
新しいブロックを、ページ内の任意の位置に指定して追加することも可能です。
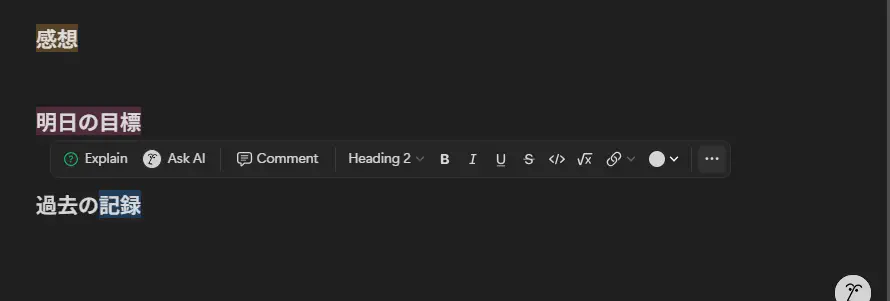
そこで、ブロックIDを取得する必要があります。ブロックIDを取得するためには、目当てのブロックを選択した状態にすると、浮かび上がるナビゲーションメニューの右側に横3点リーダーが表示されますので、それをクリックして開かれたコンテキストメニュー内の「Copy link to block」をクリックすると、目当てのブロックIDが含まれたURLを取得できます。
その取得したURLで、「https://www.notion.so/xxxxxxxxxxxxxxxxxxxxxxxxxxxxxxxx?pvs=y#zzzzzzzzzzzzzzzzzzzzzzzzzzzzzzzz」の形式のものが取得できます。それぞれのプロパティは以下の情報を持っています。
- xxxxxxxxxxxxxxxxxxxxxxxxxxxxxxxx・・・ページID
- y・・・分かりません。(0~4まで調べてみましたが違いが分かりませんでした。)
- zzzzzzzzzzzzzzzzzzzzzzzzzzzzzzzz・・・ブロックID
ページ内の任意の位置に、新しいブロックを追加する際には、同じく「Append block children」エンドポイントを使って、afterプロパティを設定して追加します。
下記のコードのappendChildrenOfDiary()を実行すると日記用のページが出来上がります。(100行ぐらいです。)
function appendBlockChildren(blockId, children, brotherBlockId){
  const endpoint = "https://api.notion.com/v1/blocks/" + blockId + "/children";
  const options = {
    "muteHttpExceptions": true,
    "method" : "patch",
    "headers" : {
      "Authorization": "Bearer " + getAccessToken(),
      "Notion-Version": "2022-06-28",
      "Content-Type": "application/json",
    },
    "payload" : JSON.stringify({
      "children": children
      , "after": brotherBlockId
    })
  };
  const response = UrlFetchApp.fetch(endpoint, options);
  return JSON.parse(response.getContentText());
}

function createChildrenToAppend(){
  return [
    {
      "bulleted_list_item": {
        "rich_text": [
          {
            "text": {
              "content": "シン・仮面ライダーを見た!"
            }, "annotations": {
              "bold": true
              , "italic": false
              , "strikethrough": false
              , "underline": false
              , "code": false
              , "color": "red_background"
            }
          }
        ]
      }
    }, {
      "bulleted_list_item": {
        "rich_text": [
          {
            "text": {
              "content": "シン・ゴジラは見られなかった・・・"
            }, "annotations": {
              "bold": false
              , "italic": false
              , "strikethrough": true
              , "underline": false
              , "code": false
              , "color": "gray"
            }
          }
        ]
      }
    }, {
      "bulleted_list_item": {
        "rich_text": [
          {
            "text": {
              "content": "いや、きっとシン・ゴジラを見てやるんだ・・・!"
              , "link": {
                "url": "https://ja.wikipedia.org/wiki/%E3%82%B7%E3%83%B3%E3%83%BB%E3%82%B4%E3%82%B8%E3%83%A9"
              }
            }, "annotations": {
              "bold": true
              , "italic": false
              , "strikethrough": false
              , "underline": true
              , "code": false
              , "color": "orange"
            }
          }, {
            "type": "mention"
            , "mention": {
              "type": "date"
              , "date": {
                "start": "2024-11-08"
                , "end": "2024-11-09"
              }
            }
            , "plain_text": "@2024-11-09"
          }
        ]
      }
    }
  ];
}

function appendChildrenOfDiary() {
  const blockId = "your_block_id";
  const children = createChildrenToAppend();
  const brotherId = "your_target_block_id";
  console.log(appendBlockChildren(blockId, children, brotherId));
}
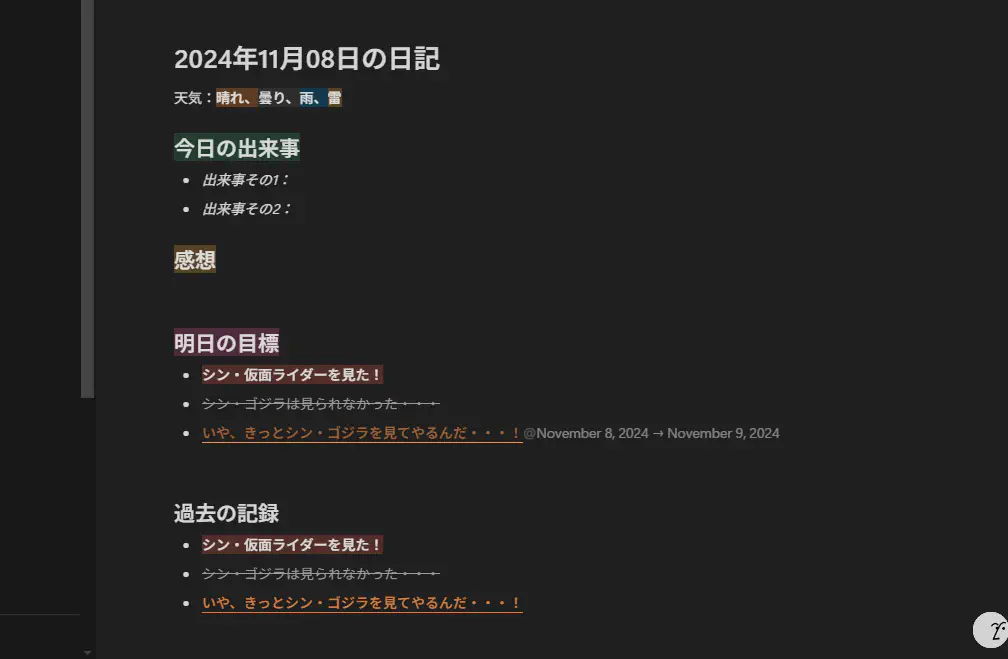
先程とは違う場所にブロックが追加されていることが確認できます。
「明日の目標」として掲げたので、シン・ゴジラのWikipediaの記事のリンクを貼って、さらに日付のメンションまで追加しました。
まとめ
今回は、NotionのAPIにリクエストして、ページ内のリッチテキストブロックを更新する方法を紹介しました。
以下、本記事のまとめです。
- Notion APIでNotionのページを更新できる。
- Notionのリッチテキストでは、以下の書式が利用できる。
- 太字
- イタリック体
- 打ち消し線
- 下線(アンダーライン)
- コードスタイル
- 文字の色、背景色の設定
- メンション
- 数式
- リンク付きテキスト
- 「Create a page」エンドポイントで、毎日の日記のテンプレートを作れたりする。
- 「Append block children」エンドポイントで、ページの中に新しいブロックを追加できる。
afterプロパティで追加する位置も設定できる。
Notionは、沢山のメモを管理することが出来るツールです。
その沢山のメモをするのにNotion APIを使って、楽にたっぷりメモをしていきましょう!
おしまい

Notionのページを自動で編集できるぞ~

いつものページを自動投稿できますね。
以上になります!



コメント