はじまり

そろそろパーマリンクを作るのが面倒になってきた!

それじゃあ自動で作るか。
ブログ記事のパーマリンクを自動で作ってくれい
ブログ記事のURLは、ドメインの後に「パーマリンク」という、その記事のページの住所の中の部屋番号的なものを割り当てる必要があります。そして、これは一意にユニークなものでなければなりません。
そのパーマリンクを作るために、重複チェック機能は作ったのですが、そろそろ記事の量も増えてきたので、生成AIくんに適当に作ってもらいたいものです。
そこで今回は、Google Apps Script(GAS)で、Gemini APIのVertex AIを使って、パーマリンク作成ツールを作っていきたいと思います。

Vertex AIについて簡単に紹介します
Google Cloudで利用できる「Vertex AI」は、以前に紹介した「Google AI Studio」と同じく、Googleが開発している生成AIである「Gemini」をベースとした生成AIを利用できるサービスです。
なぜ今回、Google AI Studioではなく、Vertex AIを使うのかと言うと、以下の理由からになります。
- Vertex AIで学習させた内容は、Geminiの学習データに利用されないから。
- Vertex AIで料金が嵩む規模感を把握するため。
Vertex AIで学習させた内容は、Geminiの学習データに利用されません。つまり、Google AI Studioで学習させた内容は、Geminiに学習されてしまいます。なので今回から、少し自分のデータを学習に利用されないようなツールを作り始めたくなったわけです。
そして、Vertex AIはGeminiの学習に利用されない反面、Google AI Studioのように無料で利用することは出来ません。そしてその料金体系を確認してはみたのですが・・・

うーん、いまいち分からん・・・!!
なので、今回Vertex AIを使ってみることで、どれぐらいの規模感でGeminiを使用すると料金が嵩んでいくのかを身を以て体験していきたいと思います。
Vertex AIへのリクエスト
まずは、Vertex AIにリクエストして、ちゃんとしたレスポンスを受け取れるようにしましょう。
Vertex AI関連のAPIを有効にする。
Google Cloudのコンソールを開いて、Vertex AIの「すべての推奨APIを有効化」します。
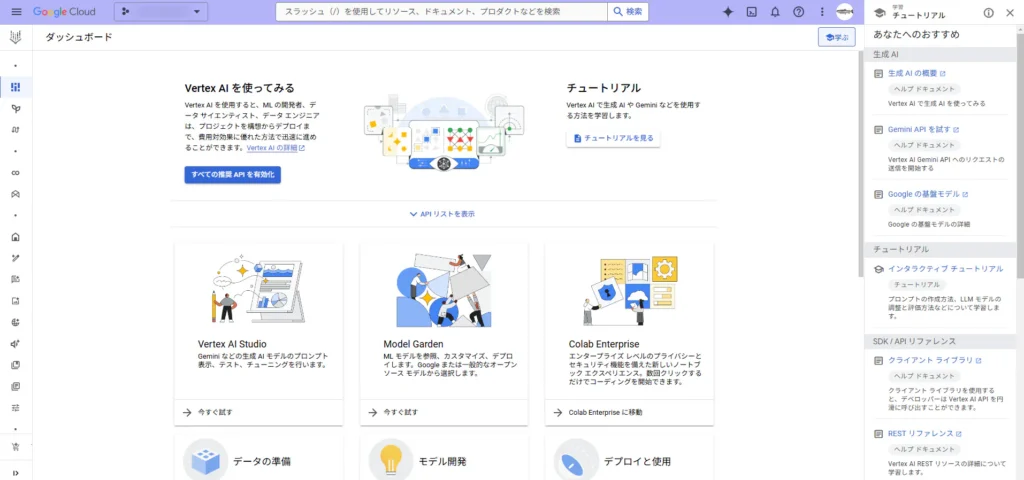
はい、有効化しました。
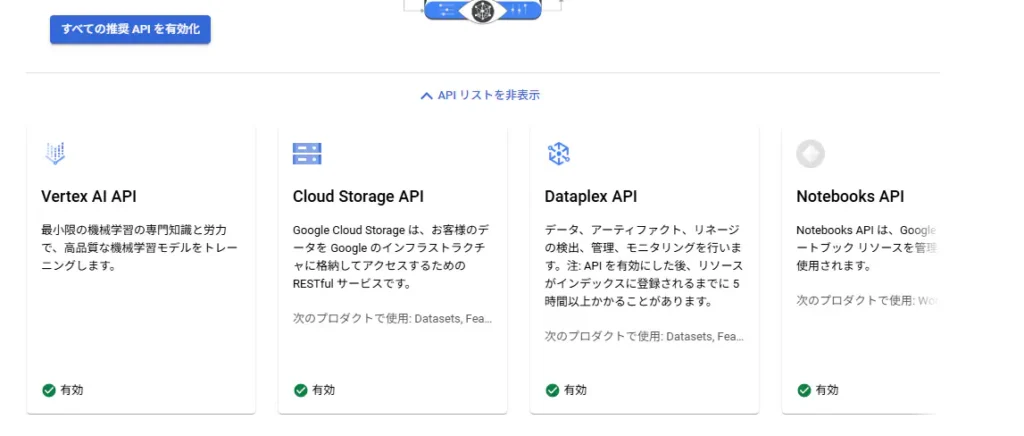
おおっ、
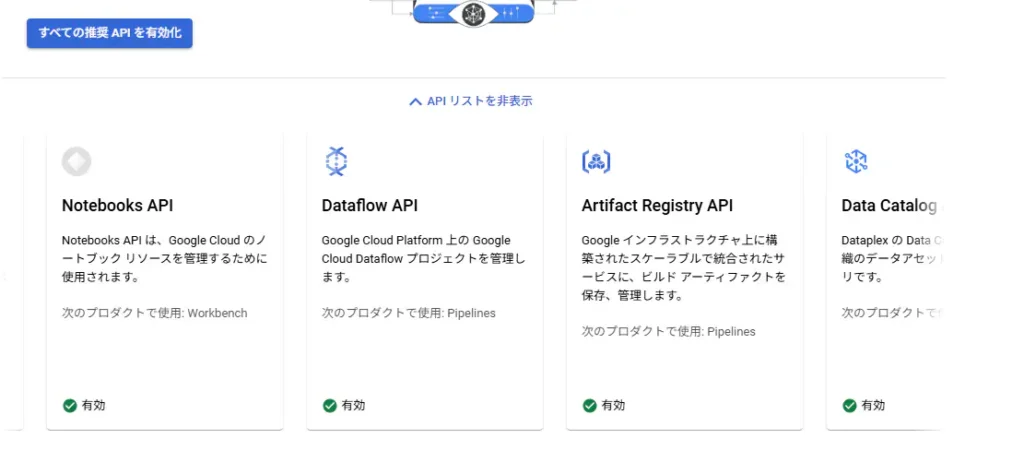
おおっ・・・、
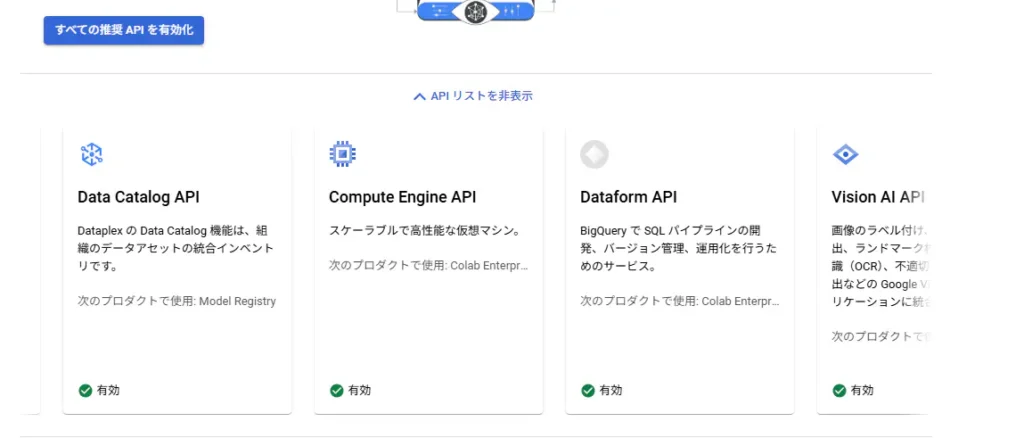
・・・・・・・・・、
・・・なんか、13個のAPIが絡んでくるみたいですね・・・。まあ、不要なものは後でオフにしておきましょう・・・。少しメモしておきます。
Vertex AIの「すべての推奨APIを有効化」で有効されるAPI
- Vertex AI API
- Cloud Storage API
- Dataplex API
- Notebooks API
- Dataflow API
- Artifact Registry API
- Data Catalog API
- Compute Engine API
- Dataform API
- Vision AI API
まずはVertex AI Studioを使ってみる。
それでは次に、「Vertex AI Studio」にアクセスします。なんだか「Google AI Studio」と似ていますね。
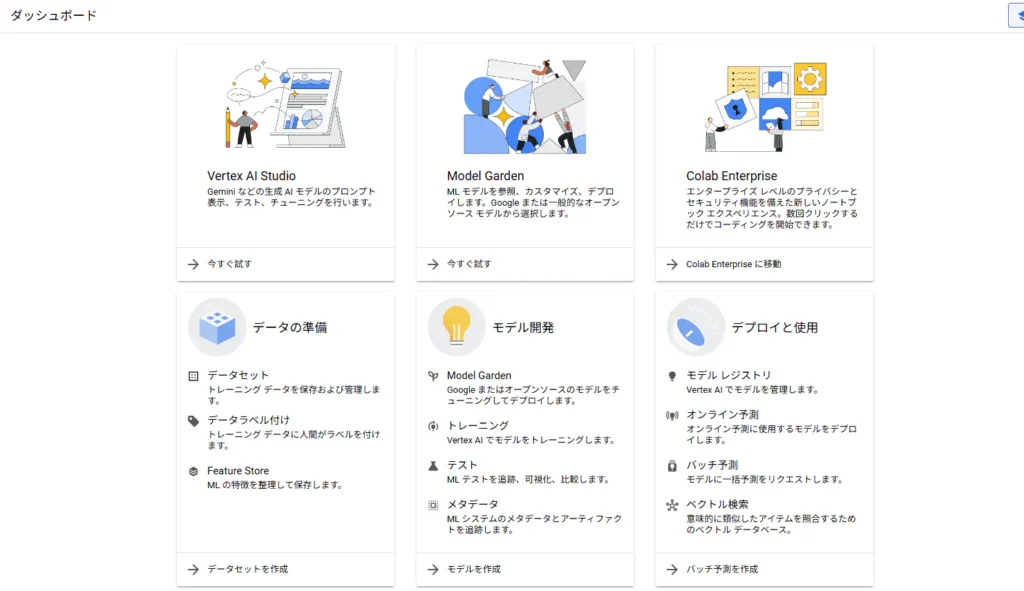
こんな画面に遷移しました。なんか始められそうな気がします。
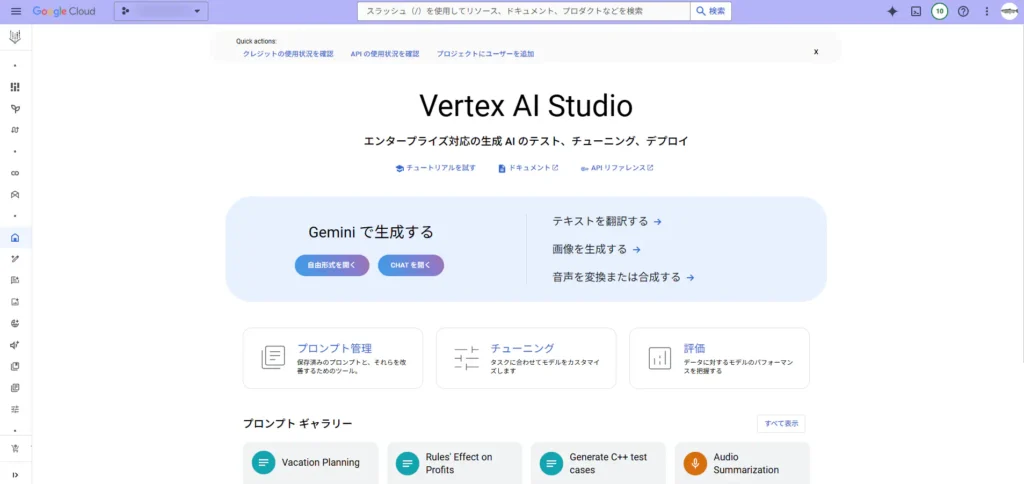
さらに進むとこんな画面が出てきました。Google AI StudioのUIと似ていますね!(いや、Vertex AI Studioの方が先発なので逆か・・・。)
それでは、「Explain how AI works.」とプロンプトしてみます。
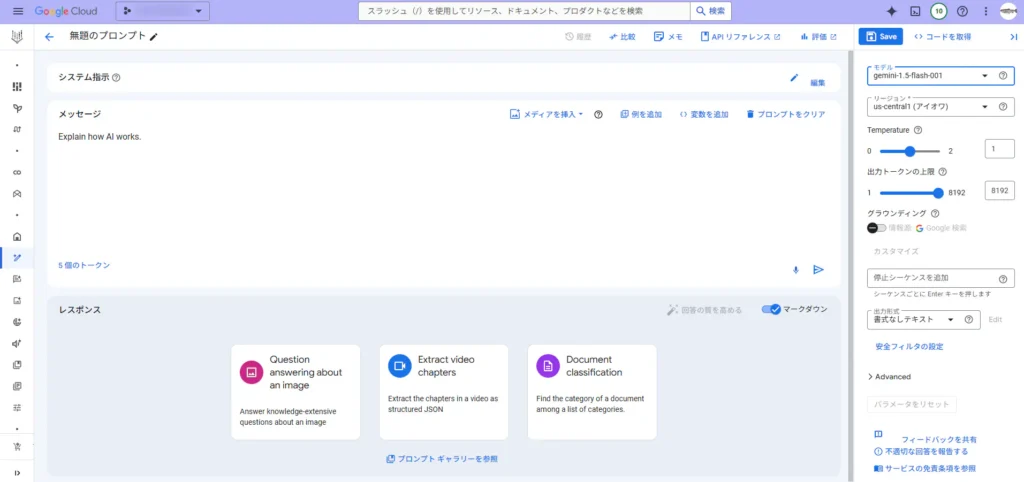
回答を返してくれました。
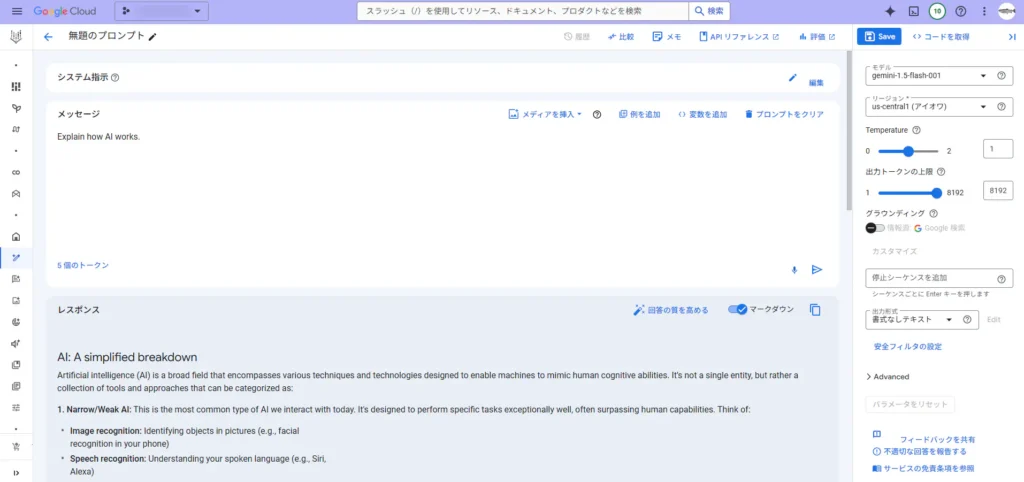
Vertex AIにおけるAPIキーを取得する。
それではこれと同じことをGoogle Apps Scriptから行えるようにしましょう!
しかし、そのためには、アクセストークンを発行しなければなりません・・・。(Google AI Studioの場合はサクッと簡単にAPIキーを発行できましたが、Google Cloudが絡んでくると少し回りくどくなります。)
というわけで、Google Cloudのコンソール上で、「APIとサービス」>「認証情報」と遷移して「Vertex AI API」を使用するためのAPIキーを作成します。Vertex AI APIにだけ使えるように制限が掛かったAPIキーを作っておきます。
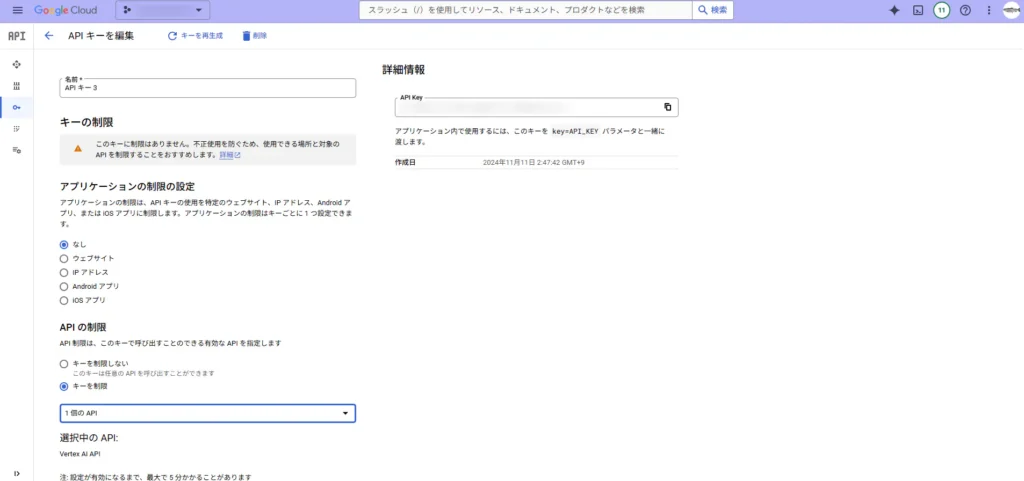
しかし、残念でした。
APIリクエストしてみたところ、401エラーが返ってきて、以下のメッセージも送られてきました。
‘Request had invalid authentication credentials. Expected OAuth 2 access token, login cookie or other valid authentication credential. See https://developers.google.com/identity/sign-in/web/devconsole-project.’
OAuth2.0かぁ・・・。ちなみに、このメッセージ内にあるURLでは、HTMLの中にスクリプトを仕込んで認証する方法が紹介されていましたが、今回はGASのライブラリを使って認証しようと思います。
OAuth2.0で認証する。
APIキーで出来れば簡単でしたが、OAuth2.0でないと認証できないと言われてしまったので、やっていきます。
まずは、GASのスクリプトエディタ上で、新しいライブラリ「OAuth2 for Apps Script」を追加します。スクリプトIDは、「1B7FSrk5Zi6L1rSxxTDgDEUsPzlukDsi4KGuTMorsTQHhGBzBkMun4iDF」です。使い方はGitHubのリポジトリをご参照下さい。
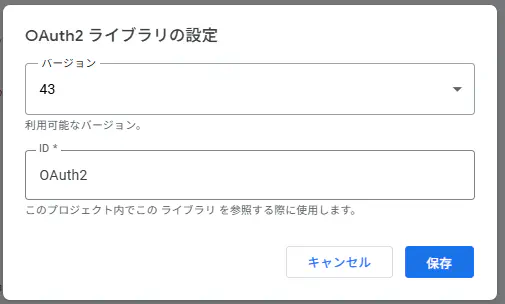
次に、Google Cloudのコンソール上で、APIキーを作ったときと同じく、「APIとサービス」>「認証情報」と遷移して、OAuth2.0の認可サーバへ認証するためのクライアントを作ります。
「アプリケーションの種類」では、ウェブアプリケーションを選択します。
リダイレクトURIは、「https://script.google.com/macros/d/スクリプトID/usercallback」です。「https://script.google.com/macros/d/xxxxxxxxxxxxxxxxxxxxxxx/usercallback」みたいな感じです。
あと、「承認済みのJavaScript生成元」の記入は不要です。
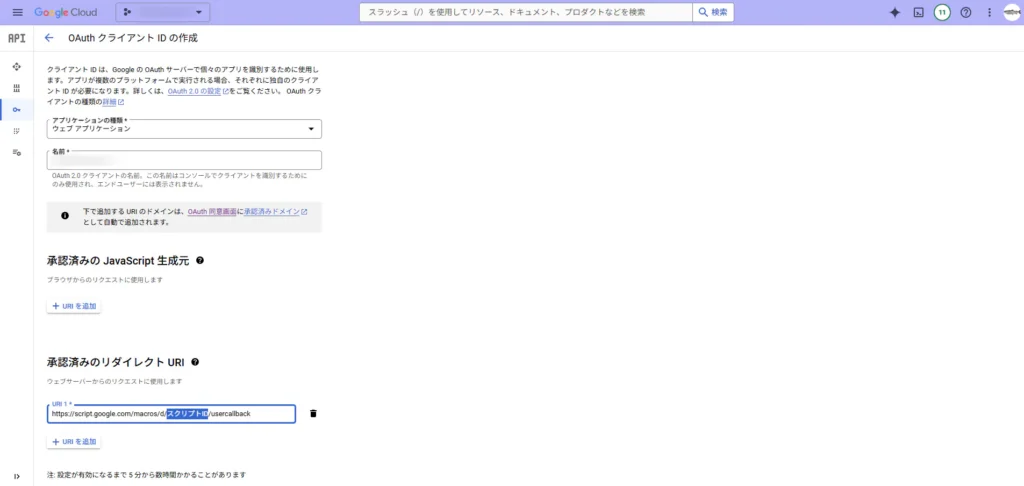
そしたらOKします。クライアントの作成に成功すると、クライアントIDとクライアントシークレットが表示されるので、それをメモっておきます。
設定が済んだので、認証部分のGASを書いていきます。今回は、OAuth2.0の細かい部分は省きます。一応下記のコードでOAuth2.0認証は達成しました。
/**
 * @return {null}
*/
function logoutOauthSvcForVertexAi() {
  const oauthMgr = new OauthServiceMgr();
  const service = oauthMgr.getVertexAiService();
  service.reset();
  const body = `<p>Session has reset on Vertex AI API.</p>`;
  const template = HtmlService.createTemplate(body);
  const page = template.evaluate();
  SpreadsheetApp.getUi().showModalDialog(page, "Logged out from Google API");
}

/**
 * @param {string} request
 * @return {HtmlOutput}
*/
function authCallbackForVertexAi(request) {
  const oauthMgr = new OauthServiceMgr();
  const service = oauthMgr.getVertexAiService();
  const isAuthorized = service.handleCallback(request);
  console.log(`authCallbackForVertexAi: xxxxxxxxxxxxxxxxxxxxxxxxxxxxxxxxxxxxxxxxxxxxxx`);
  if (isAuthorized) {
    return HtmlService.createHtmlOutput("Success! You can close this tab. Redo autocreate a permalink.");
  } else {
    return HtmlService.createHtmlOutput("Denied. You can close this tab");
  }
}

/**
 * @class
*/
class OauthServiceMgr {
  /**
   * @constructor
   * @return {null}
  */
  constructor(){

  }
  /**
   * @classmethod
   * @return {OAuth2.Service_}
  */
  getVertexAiService(){
    const id = VERTEX_AI_CLIENT_ID;
    const secret = VERTEX_AI_CLIENT_SECRET;
    console.log(`getVertexAiService: xxxxxxxxxxxxxxxxxxxxxxxxxxxxxxxxxxxxxxxxxxxxxx`);
    return OAuth2.createService("VERTEX_AI_API")
      .setAuthorizationBaseUrl("https://accounts.google.com/o/oauth2/auth")
      .setTokenUrl("https://accounts.google.com/o/oauth2/token")
      .setClientId(id)
      .setClientSecret(secret)
      .setCallbackFunction("authCallbackForVertexAi")
      .setPropertyStore(PropertiesService.getScriptProperties())
      .setScope("https://www.googleapis.com/auth/cloud-platform")
      .setParam("login_hint", Session.getActiveUser().getEmail())
  }
  /**
   * @classmethod
   * @param {OAuth2.Service_} service
   * @return {null}
  */
  authenticateVertexAi(service){
    const authorizationUrl = service.getAuthorizationUrl();
    const body = `<a href="<?= authorizationUrl ?>" target="_blank">Authenticate</a>`;
    let template = HtmlService.createTemplate(body);
    template.authorizationUrl = authorizationUrl;
    let page = template.evaluate();
    SpreadsheetApp.getUi().showModalDialog(page, "Google API Authentication");
    console.log(`authenticateVertexAi: xxxxxxxxxxxxxxxxxxxxxxxxxxxxxxxxxxxxxxxxxxxxxx`);
  }
}

/**
 * @return {boolean}
*/
function createPermalinkWithLlm(){
  const myScriptName = MY_SCRIPT_NAME;
  const sheet1st = SHEET_NAME_DISSEMINATING_1ST;
   /**
   * @description Create a permalink with the generative AI on Vertex AI API.
   * @param {string} apiToken
   * @param {string} model
   * @param {string} prompt
   * @return {number} Return -1 if not duplicated.
  */
  function requestToVertexAi(apiToken, model, prompt){
    const projectId = GOOGLE_CLOUD_PROJECT_ID;
    const location = "us-central1";
    const endpoint = `https://${location}-aiplatform.googleapis.com/v1/projects/${projectId}/locations/${location}/publishers/google/models/${model}:streamGenerateContent`;
    const options = {
      "muteHttpExceptions": true
      , "method" : "post"
      , "headers" : {
        "Content-Type": "application/json"
        , "Authorization": `Bearer ${apiToken}`
      }
      , "payload" : JSON.stringify({
        "contents": {
          "role": "user"
          , "parts": [
            {
              "text": `${prompt}`
            }
          ]
        }
    })
    };
    const response = UrlFetchApp.fetch(endpoint, options);
    return JSON.parse(response.getContentText());
  }

  function promptToGenAi(token) {
    const model = "gemini-1.5-flash-001";
    // const model = "gemini-1.5-flash-002";
    const prompt = "Explain how AI works.";

    const result = requestToVertexAi(token, model, prompt);
    const lines = result.map(c => {
      return c["candidates"][0]["content"]["parts"][0]["text"];
    });
    const sep = " "; // half-width space
    const sentence = lines.join(sep);
    console.log(result);
    console.log(`promptToGenAi: 1111111111111111111111111111111111111111111111111`);
    console.log(result[0]["candidates"][0]["content"]["parts"][0]["text"]);
    console.log(`promptToGenAi: 77777777777777777777777777777777777777777777777777`);
    console.log(lines);
    console.log(sentence);
    return result;
  }

  const oauthMgr = new OauthServiceMgr();
  const svc = oauthMgr.getVertexAiService();
  if (!svc.hasAccess()) {
    oauthMgr.authenticateVertexAi(svc);
    return false;
  }

  const apiToken = svc.getAccessToken();
  promptToGenAi(apiToken);

  return true;
}
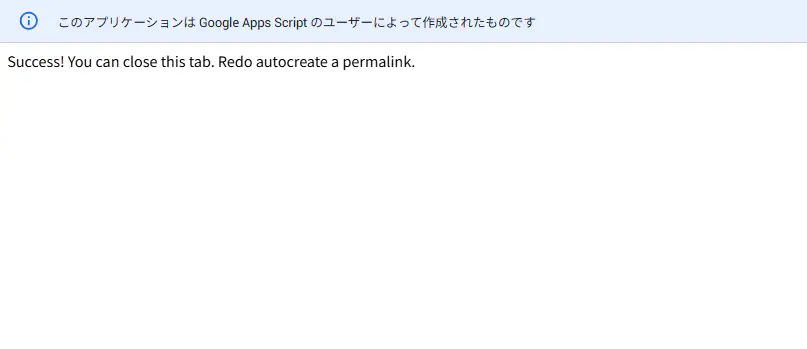
上記のコードを実行すると、認可サーバのURLがリンクされたテキストがHTMLで表示されます。
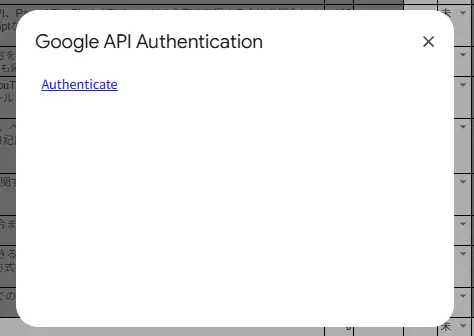
サーバがちゃんと認可できると、先程のリンクを押して表示されるページにこんな文字が表示されます。
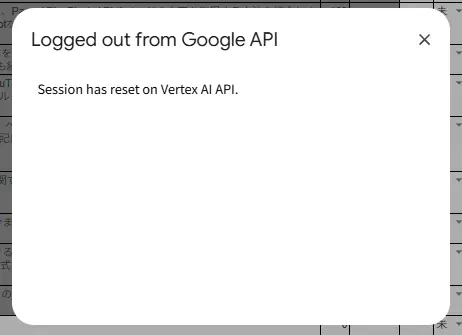
セッションは使わないのであれば切断する必要があります。logoutOauthSvcForVertexAi()関数を別途実行することによって、クライアントをVertex AI APIが機能しているアプリからログアウトさせます。
僕が最も引っ掛かったのが、権限周りのスコープの設定です。
Vertex AI APIのOAuth2.0認証を達成するにあたって、現在2024-11-11時点では、Vertex AIの機能に絞られたスコープはまだ存在しないみたいです。そのため、以下のようにスコープを設定したら、Vertex AI APIを叩けるようになりました。
- OAuth2.0クライアントのスコープに
"https://www.googleapis.com/auth/cloud-platform"を入れる。 - appscript.jsonの
"scope"に"https://www.googleapis.com/auth/userinfo.email"を入れる。
一般的なOAuth2.0スコープは、このページを見ればおおよそ把握できるんですけど・・・、

今回使った"cloud-platform"とかは、別のページで見つけました。まとまっていてほしい・・・。

OAuth2.0クライアントのスコープに"https://www.googleapis.com/auth/cloud-platform"を入れるのは、入れないとVertex AI APIを実行することが出来ないためです。いやー、このスコープを探すのには苦労しました。ググってたまたま見つけたのは良かったんですけど、ちゃんとGoogle Cloudのコンソール上で確認することが出来るんですよね。その方法を探すのに時間が掛かってしまいました。
その方法は、Google Cloudのコンソール上で「Google Auth Platform」>「データアクセス」の順番でクリックしていくと、権限スコープをもっと増やすかどうかを設定できる画面に移動できるので、そこに書いてあるスコープを見てOAuthに必要なスコープを確認することが出来ます。「Vertex AI API」には"auth/cloud-platform"のサフィックスが付くスコープが記載されていました。
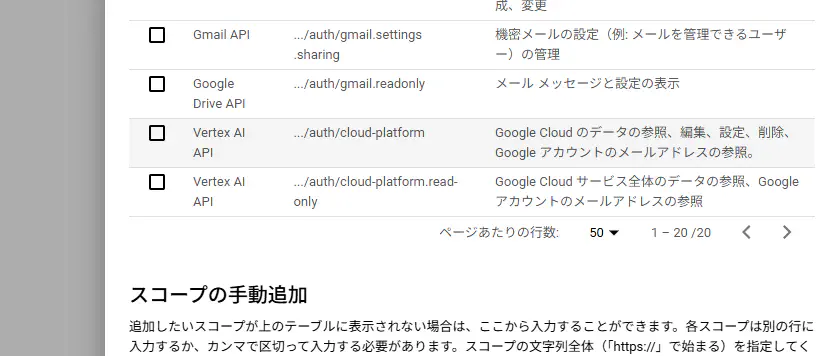
本当に全然ググっても出てこなかったので、こんなページまで見つけてしまう始末。
このページの中にある「Vertex AI の事前定義ロール」にある文字とかを入れておけば行けそうな気がしましたが、そうは問屋が卸さなかった・・・。しかし、おそらくこれから権限周りの開発が進んでいったら、これと似たような名前のスコープが追加されそうな気はします。

GASからプロンプトを込めてリクエストする。
現在、Vertex AIでサポートされているAIモデルはこの公式ページに書いてある通りでしょう。

2024-11-11時点では、以下のモデルがサポートされています。
| モデル | バージョン |
|---|---|
| Gemini 1.5 Flash | gemini-1.<wbr>5-flash-001gemini-1.<wbr>5-flash-002 |
| Gemini 1.5 Pro | gemini-1.<wbr>5-pro-001gemini-1.<wbr>5-pro-002 |
| Gemini 1.0 Pro Vision | gemini-1.<wbr>0-pro-001gemini-1.<wbr>0-pro-vision-001 |
| Gemini 1.0 Pro | gemini-1.<wbr>0-progemini-1.<wbr>0-pro-001gemini-1.<wbr>0-pro-002 |
この公式チュートリアルのプロンプトを真似て作っていきます。

そして実際に出来たプロンプトを含んだコードはこんな感じです。
/**
 * @return {boolean}
*/
function createPermalinkWithLlm(){
  const myScriptName = MY_SCRIPT_NAME;
  const sheet1st = SHEET_NAME_DISSEMINATING_1ST;

  /**
   * @param {string} sheetName
   * @return {any[][]}
  */
  const getAllRecords = sheetName => {
    const sheet = SpreadsheetApp.getActive().getSheetByName(sheetName);
    const records = readGssRecords(sheet);
    return records;
  };
  /**
   * @param {any[][]} records
   * @return {string[]}
  */
  const getTitlesAndPermalinks = records => {
    const col1 = COLUMN_FOR_TITLE_1ST;
    const col2 = COLUMN_FOR_PERMALINK_1ST;
    const permalinks = records.map(r => {
      return [r[col1 - 1], r[col2 - 1]];
    })
    return permalinks;
  };
  /**
   * @description Check duplication to return index of duplicated string.
   * @param {string[]} arr
   * @param {string} target
   * @return {number} Return -1 if not duplicated.
  */
  const checkDuplicationInArray = (arr, target) => {
    const index = arr.indexOf(target);
    return index;
  };

   /**
   * @description Create a permalink with the generative AI on Vertex AI API.
   * @param {string} apiToken
   * @param {string} model
   * @param {string} prompt
   * @return {number} Return -1 if not duplicated.
  */
  function requestToVertexAi(apiToken, model, prompt){
    const projectId = GOOGLE_CLOUD_PROJECT_ID;
    const location = "us-central1";
    const endpoint = `https://${location}-aiplatform.googleapis.com/v1/projects/${projectId}/locations/${location}/publishers/google/models/${model}:streamGenerateContent`;
    const options = {
      "muteHttpExceptions": true
      , "method" : "post"
      , "headers" : {
        "Content-Type": "application/json"
        , "Authorization": `Bearer ${apiToken}`
      }
      , "payload" : JSON.stringify({
        "contents": {
          "role": "user"
          , "parts": [
            {
              "text": `${prompt}`
            }
          ]
        }
    })
    };
    const response = UrlFetchApp.fetch(endpoint, options);
    return JSON.parse(response.getContentText());
  }

  function promptToGenAi(token) {
    const model = "gemini-1.5-flash-001";
    // const model = "gemini-1.5-flash-002";
    const prompt = "Explain how AI works.";

    const result = requestToVertexAi(token, model, prompt);
    const lines = result.map(c => {
      return c["candidates"][0]["content"]["parts"][0]["text"];
    });
    const sep = " "; // half-width space
    const sentence = lines.join(sep);
    console.log(result);
    console.log(`promptToGenAi: 1111111111111111111111111111111111111111111111111`);
    console.log(lines);
    console.log(sentence);
    return sentence;
  }

  function createPermalinks(titlesAndPermalinks){
    let generatedPermalinks = promptToGenAi();
    const permalinks = titlesAndPermalinks.map(rec => {
      return rec[1];
    })
    const filteredPermalinks = generatedPermalinks.filter((p) => checkDuplicationInArray(permalinks, p) === -1);
    // const index = checkDuplicationInArray(permalinks, searchString);
    console.log(filteredPermalinks);
    return filteredPermalinks;
  }

  const oauthMgr = new OauthServiceMgr();
  const svc = oauthMgr.getVertexAiService();
  if (!svc.hasAccess()) {
    oauthMgr.authenticateVertexAi(svc);
    return false;
  }

  const records = getAllRecords(sheet1st);
  console.log(records);
  console.log(`createPermalinkWithLlm: 1111111111111111111111111111111111111111111111111`);
  const titlesAndPermalinks = getTitlesAndPermalinks(records);
  console.log(titlesAndPermalinks);
  console.log(`createPermalinkWithLlm: 3333333333333333333333333333333333333333333333333`);

  const apiToken = svc.getAccessToken();
  promptToGenAi(apiToken);
}
上記のコード内のpromptToGenAiを実行すると、Vertex AI APIからは下記の文字列が返ってきます。配列だとこんな感じです。この文字列を半角スペースで結合すれば本来の文章になりそうです。
‘##’, ‘ Understanding AI: It\’s not magic, it\’s math and data!\n\n’, ‘Artificial Intelligence (AI) isn\’t a single thing, but rather a broad’, ‘ field encompassing various techniques. At its core, AI aims to create systems that can mimic human intelligence and perform tasks that typically require human expertise. \n\nHere\’s a’, ‘ simplified breakdown of how AI works:\n\n1. Data is King: AI systems rely heavily on large amounts of data to learn and improve. This data can’, ‘ be anything from text and images to sensor readings and financial records. \n\n2. Algorithms: The Brains: Algorithms are sets of instructions that tell the AI how to process and learn from the data. Different AI techniques use different types of’, ‘ algorithms:\n\n * Machine Learning (ML): Systems learn from data without explicit programming. They identify patterns and make predictions based on the data they\’ve seen. \n * Deep Learning (DL): A subset of ML’, ‘ using artificial neural networks, inspired by the structure of the human brain. These networks are particularly good at recognizing patterns in complex data like images and speech.\n\n3. Training: Feeding the AI: The AI system is “trained” on the data, meaning the algorithms adjust themselves to find the best way to process and’, ‘ understand the information. This is like showing a child many pictures of a dog to teach them what a dog looks like.\n\n4. Inference: Making Predictions: Once trained, the AI can use its knowledge to make predictions or take actions based on new, unseen data. For example, a trained image recognition system can identify’, ‘ different objects in a photo.\n\n5. Feedback and Improvement: The AI\’s performance is constantly evaluated, and feedback is used to further refine the algorithms and improve its accuracy. This is a continuous loop that allows the AI to learn and adapt over time.\n\nExamples of AI in action:\n\n* ‘, ‘Self-driving cars: Using sensors, cameras, and ML, they navigate roads and react to changing conditions.\n* Spam filters: ML identifies patterns in emails to sort spam from legitimate messages.\n* Recommendation systems: AI suggests movies, products, or music based on your preferences.\n* Virtual assistants:’, ‘ Like Siri or Alexa, they understand your voice and respond to your requests.\n\nKey points to remember:\n\n* AI is not sentient or conscious. It simply follows instructions based on the data it has been trained on.\n* AI is a powerful tool, but it\’s important to understand its limitations and potential’, ‘ biases.\n* The field of AI is constantly evolving, with new breakthroughs emerging all the time.\n\nThis is a simplified explanation of AI. The details and specific techniques can be quite complex, but the core concepts remain consistent. By understanding the basic principles of AI, you can gain a better grasp of this rapidly growing field’, ‘ and its impact on our lives. \n’
パーマリンクを自動生成する。
パーマリンクを生成するためのプロンプト
それでは、今回やってみたい処理を実装していきます。今回使うAIモデルは「Gemini 1.5 Flash 001」です。
プロンプトの中には、以下の情報を載せます。これらの情報からVertex AIで類推してもらって、新しいパーマリンクを生成してもらいます。
- 今まで書いてきたブログ記事のタイトル
- 今まで書いてきたブログ記事のパーマリンク
そして、Vertex AIにプロンプトする内容はこんな感じです。まあ、今日のAIは帰納的なので、文字数の要件定義はおまけ程度です。
今まで書いたブログ記事の[# 題名とパーマリンクのペアの一覧]を参考に、[# パーマリンクの要件]を満たしたパーマリンクを作成して。
[# 題名とパーマリンクのペアの一覧]
—
[[【GAS】Google Apps Scriptで書いたコードをGiitHubで公開するための段取り,gas-setup-to-publish-github],[【Googleスプレッドシート、GAS】選択した範囲をHTMLのtableタグとして画面上に出力する,gas-selected-area-to-html-table-2],[DaVinci Resolve 18でゆっくり動画っぽいものをPythonで効率的に作ろうとしたけど断念した話,davinciresolve-yukkuri-giveup],[【Python】1つのファイル内における関数の依存関係をMermaidの書式で出力する,python-mermaid-print-dependencies],[【Satisfactory】レアな資源の場所(石英),satisfactory-where-is-rare-item2],[【ゲーム】Steamリプレイ2022の自分がプレイした履歴を見てみた,steamreplay-2022],[【GitHub Actions】実行時にパラメータ項目を設定する,githubactions-setting-parameter],[【Google Apps Script】onOpen時に「Spreadsheet.openByIdを呼び出す権限がありません」となり、メニューが追加されない,gas-onopne-auth-error]]
—
[# 新しいブログ記事の題名]
—
【GAS】Gemini APIでブログのパーマリンクを自動生成する
—
[# パーマリンクの要件]
—
– [# 新しいブログ記事の題名]に適している
– 文字数は30文字以内である
– 5通り作って、コードブロックの中に配列として出力する。その配列は1文字目の昇順にソートする。
—
ちなみに上記のプロンプトをVertex AIに投げるとこんな感じの返答が返ってきます。
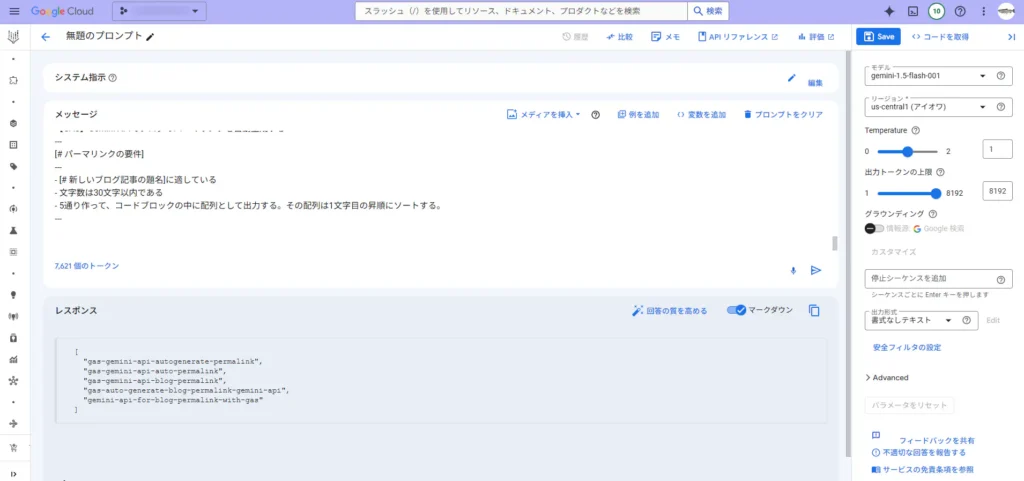
パーマリンクを生成するためのGASコード
そのプロンプトを踏まえた上での処理全体のコードがこちらになります。
// The functions to authenticate with OAuth2.0: START ================================================================

/**
 * @return {null}
*/
function logoutOauthSvcForVertexAi() {
  /**
   * @param {string} body
   * @param {string} title
   * @return {null}
  */
  const displayHtmlPage = (body, title) => {
    const template = HtmlService.createTemplate(body);
    const page = template.evaluate();
    SpreadsheetApp.getUi().showModalDialog(page, title);
  }
  const oauthMgr = new OauthServiceMgr();
  const service = oauthMgr.getVertexAiService();
  service.reset();
  displayHtmlPage(`<p>Session has reset on Vertex AI API.</p>`, "Logged out from Google API");
}

/**
 * @param {string} request
 * @return {HtmlOutput}
*/
function authCallbackForVertexAi(request) {
  const oauthMgr = new OauthServiceMgr();
  const service = oauthMgr.getVertexAiService();
  const isAuthorized = service.handleCallback(request);
  console.log(`authCallbackForVertexAi: xxxxxxxxxxxxxxxxxxxxxxxxxxxxxxxxxxxxxxxxxxxxxx`);
  if (isAuthorized) {
    return HtmlService.createHtmlOutput("Success! You can close this tab. Redo autocreate a permalink.");
  } else {
    return HtmlService.createHtmlOutput("Denied. You can close this tab");
  }
}

/**
 * @class
*/
class OauthServiceMgr {
  /**
   * @constructor
   * @return {null}
  */
  constructor(){

  }
  /**
   * @classmethod
   * @return {OAuth2.Service_}
  */
  getVertexAiService(){
    const id = VERTEX_AI_CLIENT_ID;
    const secret = VERTEX_AI_CLIENT_SECRET;
    console.log(`getVertexAiService: xxxxxxxxxxxxxxxxxxxxxxxxxxxxxxxxxxxxxxxxxxxxxx`);
    return OAuth2.createService("VERTEX_AI_API")
      .setAuthorizationBaseUrl("https://accounts.google.com/o/oauth2/auth")
      .setTokenUrl("https://accounts.google.com/o/oauth2/token")
      .setClientId(id)
      .setClientSecret(secret)
      .setCallbackFunction("authCallbackForVertexAi")
      .setPropertyStore(PropertiesService.getScriptProperties())
      .setScope("https://www.googleapis.com/auth/cloud-platform")
      .setParam("login_hint", Session.getActiveUser().getEmail())
  }
  /**
   * @classmethod
   * @param {OAuth2.Service_} service
   * @return {null}
  */
  authenticateVertexAi(service){
    const authorizationUrl = service.getAuthorizationUrl();
    const body = `<a href="<?= authorizationUrl ?>" target="_blank">Authenticate</a>`;
    let template = HtmlService.createTemplate(body);
    template.authorizationUrl = authorizationUrl;
    let page = template.evaluate();
    SpreadsheetApp.getUi().showModalDialog(page, "Google API Authentication");
    console.log(`authenticateVertexAi: xxxxxxxxxxxxxxxxxxxxxxxxxxxxxxxxxxxxxxxxxxxxxx`);
  }
}

// The functions to authenticate with OAuth2.0: END ================================================================

// The functions to generate permalinks with Vertex AI: START ================================================================

/**
 * @return {boolean}
*/
function createPermalinkWithLlm(){
  const myScriptName = MY_SCRIPT_NAME;
  const sheet1st = SHEET_NAME_DISSEMINATING_1ST;

  /**
   * @param {string} sheetName
   * @return {any[][]}
  */
  const getAllRecords = sheetName => {
    const sheet = SpreadsheetApp.getActive().getSheetByName(sheetName);
    const records = readGssRecords(sheet);
    return records;
  };

   /**
   * @description Create a permalink with the generative AI on Vertex AI API.
   * @param {string} apiToken
   * @param {string} model
   * @param {string} prompt
   * @return {number} Return -1 if not duplicated.
  */
  const requestToVertexAi = (apiToken, model, prompt) => {
    const projectId = GOOGLE_CLOUD_PROJECT_ID;
    const location = "us-central1";
    const endpoint = `https://${location}-aiplatform.googleapis.com/v1/projects/${projectId}/locations/${location}/publishers/google/models/${model}:streamGenerateContent`;
    const options = {
      "muteHttpExceptions": true
      , "method" : "post"
      , "headers" : {
        "Content-Type": "application/json"
        , "Authorization": `Bearer ${apiToken}`
      }
      , "payload" : JSON.stringify({
        "contents": {
          "role": "user"
          , "parts": [
            {
              "text": `${prompt}`
            }
          ]
        }
    })
    };
    const response = UrlFetchApp.fetch(endpoint, options);
    return JSON.parse(response.getContentText());
  }

  /**
   * @param {string} apiToken
   * @param {string} prompt
   * @return {string}
  */
  const promptToGenAi = (apiToken, prompt) => {
    const model = "gemini-1.5-flash-001";
    // const model = "gemini-1.5-flash-002";

    const result = requestToVertexAi(apiToken, model, prompt);
    const lines = result.map(c => {
      return c["candidates"][0]["content"]["parts"][0]["text"];
    });
    const sep = " "; // half-width space
    const sentence = lines.join(sep);
    console.log(result);
    console.log(`promptToGenAi: 1111111111111111111111111111111111111111111111111`);
    console.log(lines);
    console.log(`promptToGenAi: 77777777777777777777777777777777777777777777777777`);
    console.log(sentence);
    return sentence;
  }
  /**
   * @param {string} apiToken
   * @param {string} newBlogTitle
   * @return {string[]}
  */
  const createPermalinks = (apiToken, newBlogTitle) => {
    /**
     * @param {any[][]} records
     * @return {string[][]}
    */
    const getTitlesAndPermalinks = records => {
      const col1 = COLUMN_FOR_TITLE_1ST;
      const col2 = COLUMN_FOR_PERMALINK_1ST;
      let tps = records.map(r => {
        return [r[col1 - 1], r[col2 - 1]];
      });
      tps = tps.filter(tp => tp[0] !== "" && tp[1] !== "");
      return tps;
    };
    /**
     * @description Check duplication to return index of duplicated string.
     * @param {string[]} arr
     * @param {string} target
     * @return {number} Return -1 if not duplicated.
    */
    const checkDuplicationInArray = (arr, target) => {
      const index = arr.indexOf(target);
      return index;
    };
    /**
     * @param {string} data
     * @return {string[]}
     * @example
     * data = '```[  "gas-gemini-api-autogenerate-permalink",  "gas-gemini-api-auto-permalink",  "gas-gemini-api-blog-permalink",  "gas-auto-generate-blog-permalink-gemini-api",  "gemini-api-for-blog-permalink-with-gas"]```'
     * elements = [ 'gas-gemini-api-autogenerate-permalink', 'gas-gemini-api-auto-permalink', 'gas-gemini-api-blog-permalink', 'gas-auto-generate-blog-permalink-gemini-api', 'gemini-api-for-blog-permalink-with-gas' ]
    */
    const extractElementsFromString = (data) => {
      const elements = data.match(/"([^"]+)"/g).map(item => item.replace(/"/g, ''));
      console.log(`LlmPrompter.extractElementsFromString: xxxxxxxxxxxxxxxxxxxxxxxxxxxxxxxxxxxxxxxxxxxxxx`);
      return elements;
    }

    const records = getAllRecords(sheet1st);
    console.log(records);
    console.log(`createPermalinks: 1111111111111111111111111111111111111111111111111`);
    const srcTitlesAndPermalinks = getTitlesAndPermalinks(records);
    const srcTitlesAndPermalinksToShow = srcTitlesAndPermalinks.map(tp => {
      return `[${tp[0]},${tp[1]}]`;
    });
    console.log(srcTitlesAndPermalinks);
    console.log(`createPermalinks: 3333333333333333333333333333333333333333333333333`);
    console.log(srcTitlesAndPermalinksToShow);
    console.log(`createPermalinks: 4444444444444444444444444444444444444444444444444`);

    const prompt = `今まで書いたブログ記事の[# 題名とパーマリンクのペアの一覧]を参考に、[# パーマリンクの要件]を満たしたパーマリンクを作成して。\n[# 題名とパーマリンクのペアの一覧]\n---\n${srcTitlesAndPermalinksToShow}\n---\n[# 新しいブログ記事の題名]\n---\n【GAS】Gemini APIでブログのパーマリンクを自動生成する\n---\n[# パーマリンクの要件]\n---\n- [# 新しいブログ記事の題名]に適している\n- 文字数は30文字以内である\n- 5通り作って、コードブロックの中に配列として出力する。その配列は1文字目の昇順にソートする。\n---\n`;
    const generatedPermalinkSentence = promptToGenAi(apiToken, prompt);
    console.log(generatedPermalinkSentence);
    console.log(`createPermalinks: 555555555555555555555555555555555555555555555555`);
    const generatedPermalinks = extractElementsFromString(generatedPermalinkSentence);
    console.log(generatedPermalinks);
    console.log(`createPermalinks: 6666666666666666666666666666666666666666666666666`);
    const srcPermalinks = srcTitlesAndPermalinks.map(rec => {
      return rec[1];
    })
    console.log(srcPermalinks);
    console.log(`createPermalinks: 777777777777777777777777777777777777777777777777`);

    const filteredPermalinks = generatedPermalinks.filter((p) => checkDuplicationInArray(srcPermalinks, p) === -1);
    filteredPermalinks.sort();
    console.log(`createPermalinks: 9999999999999999999999999999999999999999999999999`);
    console.log(filteredPermalinks);
    return filteredPermalinks;
  }

  /**
   * @param {string} body
   * @param {string} title
   * @return {null}
  */
  const displayHtmlPlainPage = (body, title) => {
    const template = HtmlService.createTemplate(body);
    const page = template.evaluate();
    SpreadsheetApp.getUi().showModalDialog(page, title);
  }

  const oauthMgr = new OauthServiceMgr();
  const svc = oauthMgr.getVertexAiService();
  if (!svc.hasAccess()) {
    oauthMgr.authenticateVertexAi(svc);
    return false;
  }
  console.log(`createPermalinkWithLlm: 222222222222222222222222222222222222222222222222`);

  const apiToken = svc.getAccessToken();
  const newTitle = "スプレッドシート上にダイアログを表示して入力するなり、シートから取得する。";
  let permalinks = createPermalinks(apiToken, newTitle);
  permalinks = permalinks.map(p => {
    return `"${p}"`;
  });
  const permalinkSentence = permalinks.reduce((prev, curr) => {
    return `${prev}\n${curr}`
  });
  console.log(permalinks);
  console.log(`createPermalinkWithLlm: 666666666666666666666666666666666666666666666666`);
  console.log(permalinkSentence);
  console.log(`createPermalinkWithLlm: 777777777777777777777777777777777777777777777777`);

  let text = `<p>Generated permalinks are following.</p>`;
  text = `${text}<pre><code>${permalinkSentence}</code></pre>`;

  displayHtml("index_html", "Create a permalink with Vertex AI is Terminated...", `${text}`);
  console.log(`createPermalinkWithLlm: ==============================================`);

  return true;
}

// The functions to generate permalinks with Vertex AI: END ================================================================上記のコード(createPermalinkWithLlm)の流れとしては、こんな感じです。これから、生成AIからのレスポンスを構造的に処理したい場合は、正規表現の必要性が増してきそうですね・・・。今まで全く覚える気がありませんでしたが。。。
- Vetex AI API用のOAuth2.0認証セッションを持っているか確かめる。(持っていなかったらOAuth2.0認証をして再度実行。)
- Vetex AI APIにアクセスできるので、それに対するプロンプトの内容を作る。
- プロンプトを送って返事を貰ったら、その内容を正規表現で解析して、新しいパーマリンクの配列を取得する。
- HTMLに新しいパーマリンクの配列を表示する。
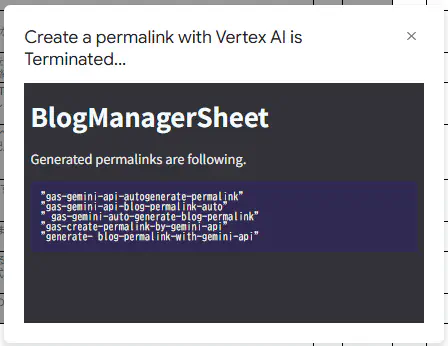
上記のコードを実行すると、こんな感じにHTML形式で新しいパーマリンクの候補が表示されます。レスポンスのトークンの切れ目に半角スペースが入ってしまっていますが、まあ後で直すとしますか・・・。
AIから提示されたこれらの候補を元に、楽にパーマリンクを作成できるようになりました!
まとめ
今回は、Google Apps Scriptで今まで自分で作ってきたブログ記事のタイトルとパーマリンクを生成AI「Gemini」にプリプロンプトして、パーマリンクを自動作成してもらう方法を紹介しました。
以下、本記事のまとめです。(2024-11-11時点。)
- Vertex AIを使えば、Geminiチャットの用に学習されることなく、LLMを利用できる。
- Vertex AI Studio上で、Google AI StudioのようにGemini等のLLMと対話できる。
- Vertex AI APIでは、APIキーを使った認証は不可能。OAuth2.0を使った認証を行う必要がある。
- HTMLのタグを使ってOAuth2.0の認証が可能だが、GASでは「OAuth2 for Apps Script」ライブラリを使って認証を行うことも可能である。
- Vertex AIからのレスポンスは文字列であるため、正規表現を使えばデータの構造を作っていくことが出来る。
これで、Google Apps ScriptからGoogle CloudのVertex AIというサービスを利用することが出来るようになりました。OAuth2.0認証が少々面倒ですが、何度か試していけば慣れます。これからも便利なサービスはどんどん試していきたいと思います。
GASに関するその他の記事
おしまい

今回はどれにしようかな。

0からパーマリンクを作らなくていいから楽になりますね。
以上になります!



コメント